
With a bit of practice, your child can have neat, easy to read handwriting when you help him or her master these simple rules.
Often all a poor handwriting really needs is a few simple tweaks. A more legible, clearer handwriting can help your child succeed academically and build up his or her confidence!
Practice these 3 simple handwriting techniques using triple lined paper (you can download and print a pdf version here).
Step 1: Sizing
This step focuses on the lowercase letters.
Initially use triple lined paper and then graduate to looseleaf paper.
Have your child write a sentence. Check to see that the lowercase letters are in the correct categories- “tall,” “small” or “under the line.”
“Tall” lowercase letters are letters b, h, d, k, l, etc. because they begin at the top line and reach all the way to the bottom line.
“Small” lowercase letters are letters a, c, e, n, w, etc. because they start at the middle line, not the top line.
“Under the line” letters are lowercase letters y, g, j, p, etc. that begin at the middle line and go under the bottom line.
How to practice sizing (see images below):
Explain to your child that some lowercase letters are tall, some are short and some go under the line.
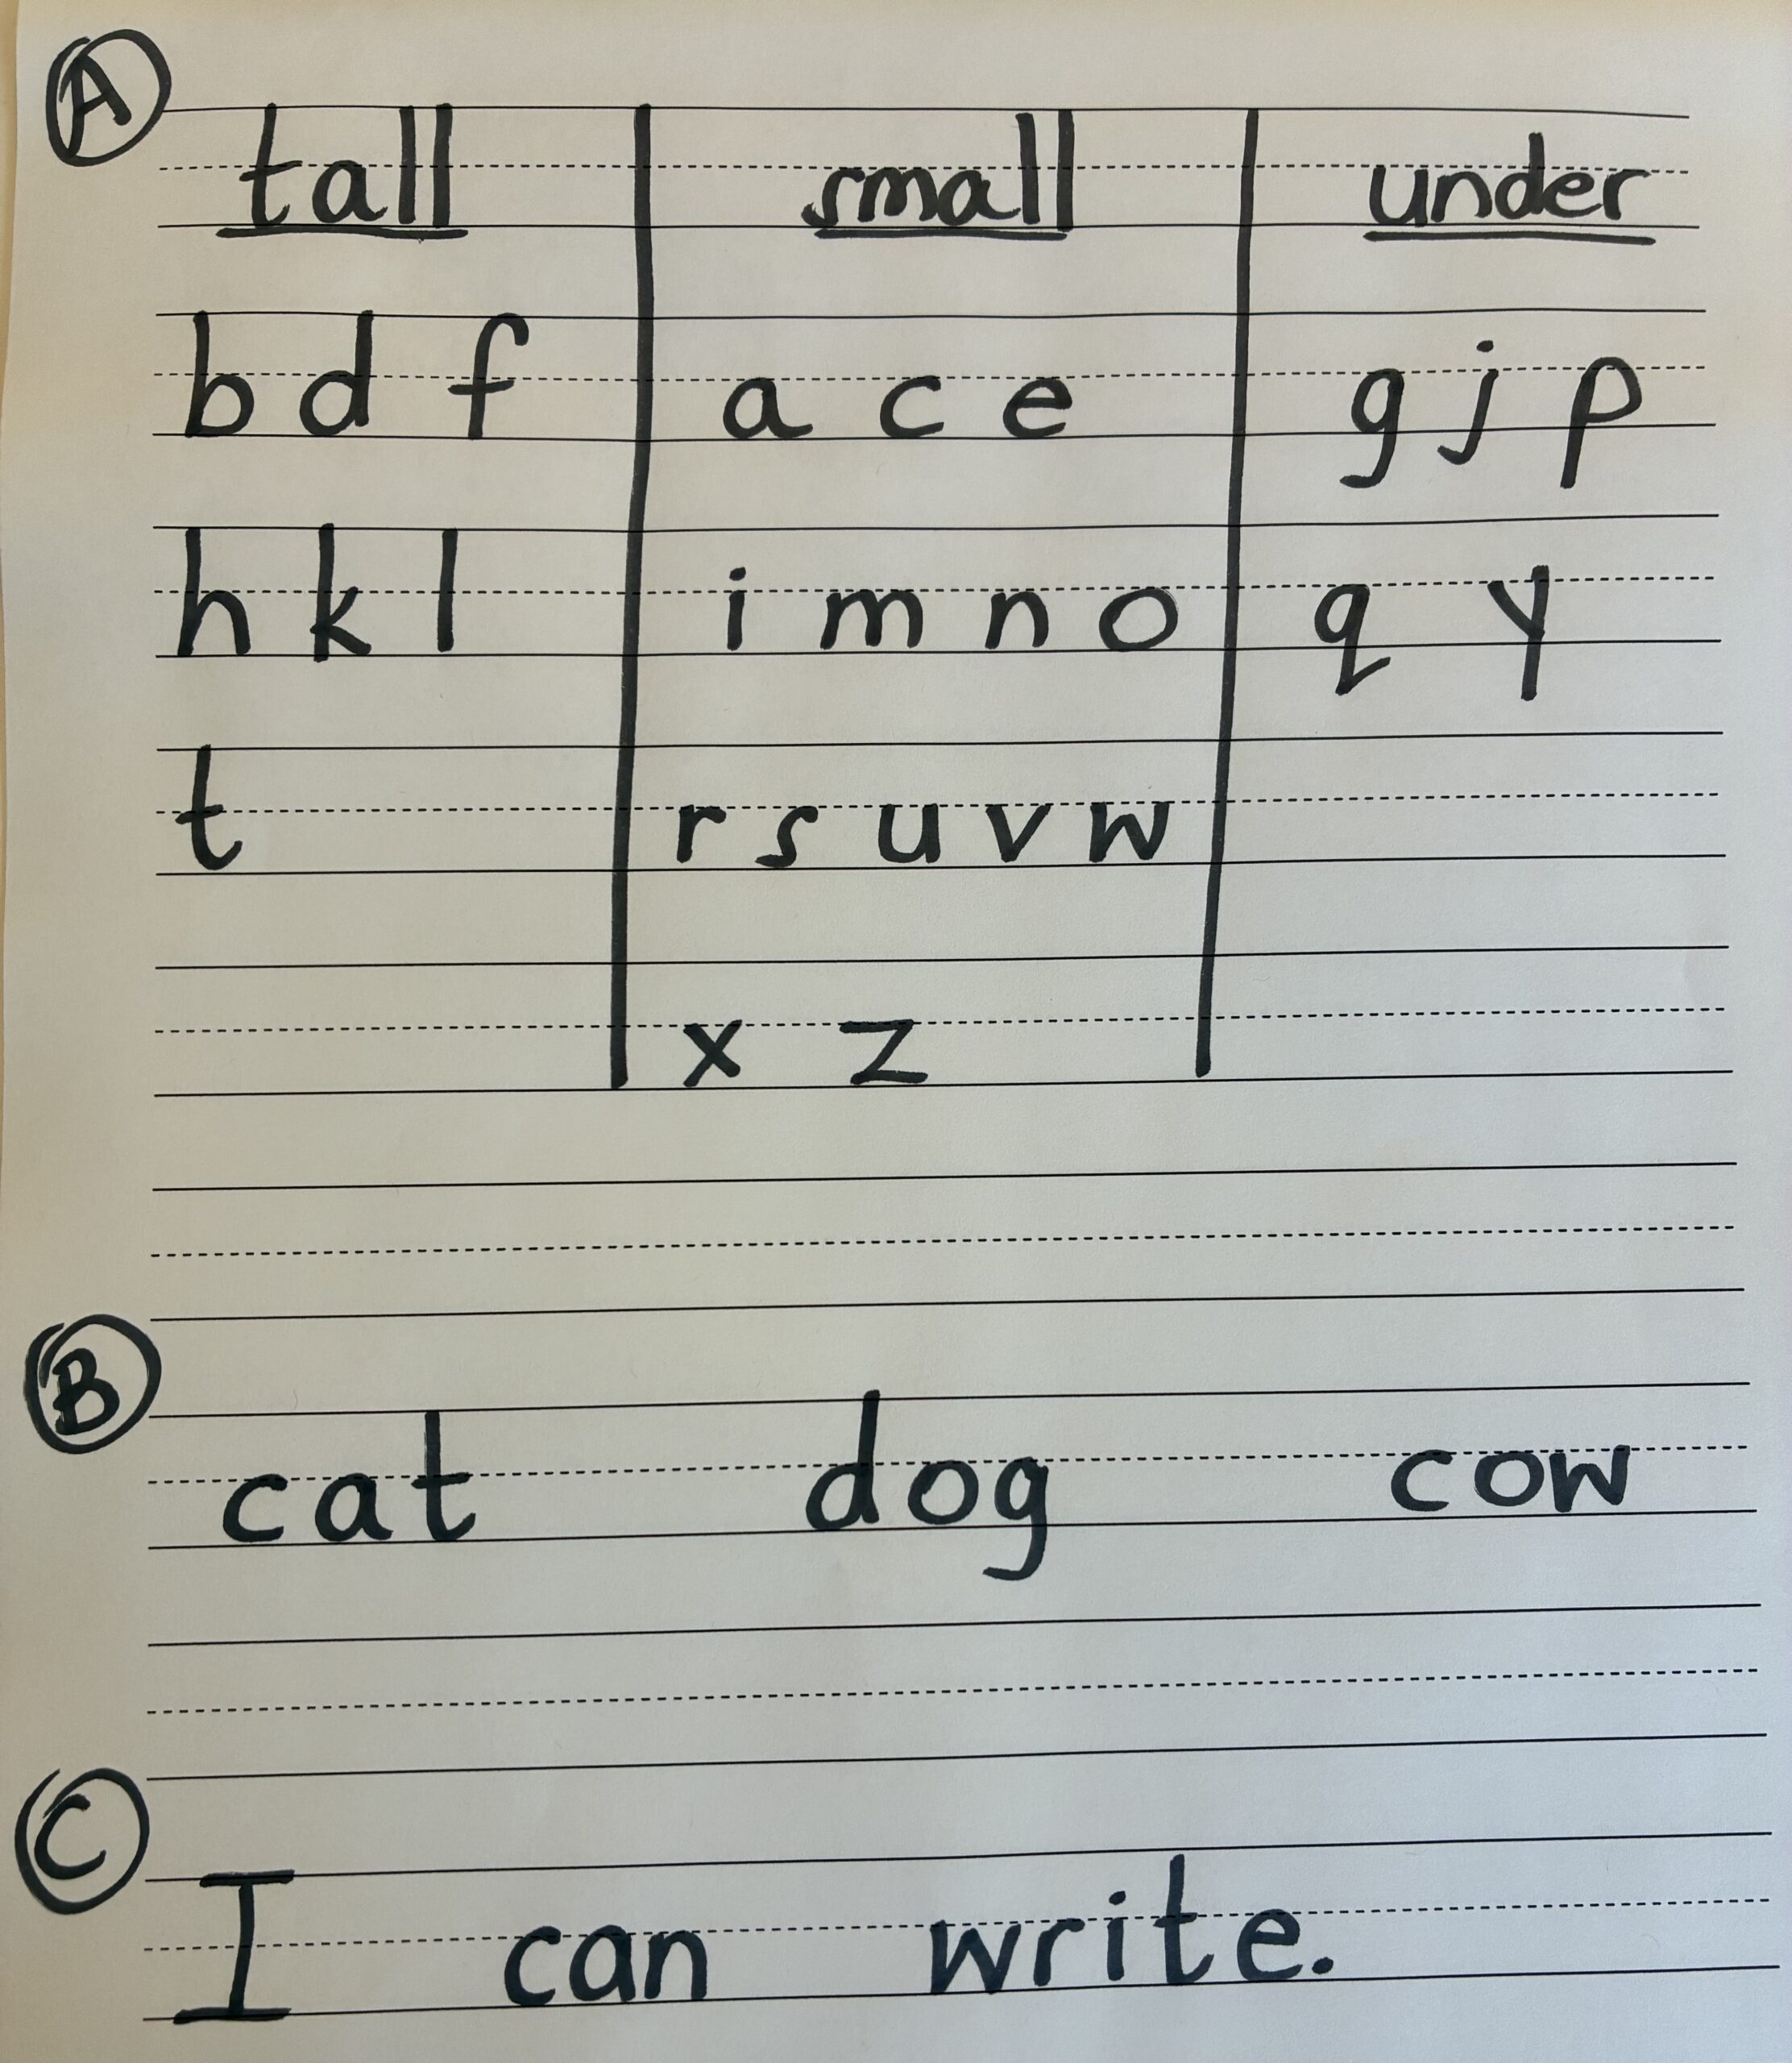
Using triple lined paper, make 3 columns: tall, small, and under. Start from lowercase letter “a” and go through the alphabet. Ask your child “In which column does this letter belong?” Have your child write each letter in the correct column.
Once this is easy for your child, have him or her write words and double check together that the letters are written correctly, according to each category. Continue on to sentences.

When mastered, move on to looseleaf paper, initially drawing a middle line in between the top and bottom lines. Then have your child write sentences with only an “imaginary” middle line.
Step 2: On the line
Have your child write a sentence.

Make sure none of the letters are “floating” (written above the bottom line) or “drowning” (under the bottom line). Go through the letters one by one, making sure all letters are aligned on the bottom line.
Step 3: Spacing
Within each word, the letters should be close together, nearly touching each other. However, within a sentence, the words should be spaced adequately apart.

When learning this skill, some children find it helpful to place 2 fingers after each word before starting to write the next word within a sentence, since this creates adequate spacing. However, the end goal is for your child to eyeball the sentence independently and make corrections as needed without using fingers as cues.
Tips:
- Introduce the rules one at a time. Practice several times a week until mastered and then move on to the next rule.
- Create a 3-step checklist for your child: sizing, on the line, spacing. Check the sentences over together and once mastered, have him check his own sentences independently.
- Make handwriting time a positive experience! Praise progress instead of criticizing mistakes.
The goal is for your child to feel confident and successful!
any tips for adults? my handwriting is always so messy
Thanks for your comment! An adult’s handwriting requires significant motivation to change. Start with exploring why you are writing this way-does your hand hurt, are the letters formed inccorrectly, or is life just too busy to focus on a neat handwriting 🙂
Going to try this. My child’s handwriting is a mess! Any special tips for kids with ADHD who don’t have the “patience” to write neatly?
Yes, handwriting requires focus and motivation. For children with ADHD who crave novelty, change up the writing utensils-markers, fun types of pencils, etc. You can also practice on various surfaces-boogie boards, colorful lined paper, etc.
What age do you start to address this?
Typically first grade is when children begin to learn handwriting in school. Once handwriting is well underway and you see they are not naturally picking up on the skills taught, you can implement any of these tips as needed.
So interesting! going to try this.. any tips for making my child’s hond stronger if it gets tired after writing for a few minutes?
You can try squeezing activities with him to strengthen the intrinsic hand muscles-squeezing playdough, putty, or ball popper toys you can find on Amazon.
This was such a clear, practical, and actually doable guide — written in that perfect calm “you’ve-got-this” tone every parent needs at homework time! I might even try fixing my own handwriting… though at this point, it may qualify as a lost cause
Looks like a great method!!!
Such a great article — practical, well-explained, and written in a way that actually makes you want to try it! You can tell it comes from someone who really understands kids (and parents). Excellent work!
This is fantastic! Clear, smart, and surprisingly fun to read — you somehow made handwriting sound exciting . Love how practical and confidence-boosting this is… feels like every parent needs this guide on their fridge!
Love this! practical — practical, positive, and super helpful!
This is so clear and broken down! Thank you for the boost to work on handwriting in such an easy way!
Any tips for pencil grip? My child has a grip that puts more pressure on his ring finger and pinky… the grip doesnt need to be perfect but a closer-to-proper grip can help in the long run with not tiring out the hand plus a neater handwriting.
I got some pencil grips, but still it’s not as helpful as I hoped.
Hi! I don’t love pencil grippers, as it’s a band-aid for a problem that needs to be solved. But for short-term, my favorite is the claw pencil gripper, available for purchase on Amazon.
Wow!! Such an incredibly clear article!!
I love how you’ve simplified handwriting improvement into such clear and achievable steps!!
Really clear and hope to implement some of these practices in my classroom. Any ideas for script hebrew writing?
Sure! You can implement the same steps in hebrew handwriting-spacing and on the line, although most of the hebrew letters are the same size.
So clear and practical with easy steps to implement!
Thanks for this interesting article! I’m wondering if you’ve found that this could help improve a boys handwriting even at age 9-10. My son’s handwriting is the typical boyish mess. He’s been “practicing”handwriting in school since first grade and I haven’t seen it make a dent. In your experience is it still possible to make a change?
Sure! I work with children that age all the time. There can be multiple factors causing a messy handwriting; these are just a few tips you can try implementing.
I love how you break it down into 3 simple steps! So relevant, practical, and easy to follow!
You make handwriting look so approachable which helps it create such a positive experience.
Totally going to use this for my daughter!!
Thank you!!
Any tips for when children write letters backwards?
Another OT here. I am currently working with a Pre1A child who almost always reverses letters. One thing I do is I make a dot where they are supposed to start together with an arrow to where the line is supposed to go. Do one line at a time until the letter is complete. It needs a lot of practice! It helps to ask the teacher how they were taught to draw the letters. The way you think it should be drawn or the way you always do it is not necessarily the way they were taught and it may confuse them every more to practice a different way.
Very clear and super practical – Thank you, Rivky. I’m thinking of introducing these ideas to the younger ones, even though they haven’t yet learned to write! Do you think they can proactively acquire the skills by drawing lines or shapes ‘tall, small, under’ or showing them how to use their fingers to create double spaces between shapes in a row?
Um Just wondering why, in this day and age a child needs to have neat handwriting?
So that he and others can actually read what he writes. Pens are not extinct yet.
Thank you for posting this! Your advice is always so practical and spot on! Thank you for the amazing spot on and results orriented work you do in session!
Thank you Rivky for sharing this with everyone! So helpful!
Just what we needed!! Thank you!
Thank you! Just last week I decided I want to improve my own handwriting but didn’t know where to start- it’s never too late! Excited to get started
Most informative and clear article. Thank you! I am a school consultant and I visit classrooms often. I have observed classrooms in which each and every student grips her pencil improperly and awkwardly. It is difficult to relearn how to hold a pencil properly. I hope that younger grade teachers could provide incentives and motivation so that students can become used to proper pencil grip when they initially learn writing. .
In wondering why they need a proper pencil grip. For years teachers have pursued me to write with a proper pencil grip despite the fact that I have a beautiful handwriting and drawing and painting skills. And it hasn’t effected me at all. So why drive a child crazy about holding the pen correctly if they got used to it a different way.
Hi, another OT here. The proper pencil grip is important because most other grasps strain the hand and make it difficulty to write fast enough to take notes as they move on to the older grades. Confession to make: i have a bad grasp that I worked on for a long time until I was able to hold the pencil properly but I still prefer the “immature” way. I had a hard time writing notes in class throughout high school because my hand would get tired and strained. One thing I check for is if the child is using a lot of pressure because that strains the hand even more. That being said some children prefer to use pressure for sensory input which is a whole other discussion…